May 10th, 2011

Advanced Web Rankings Independent Review

Search Engine Optimization (SEO) practices are a routine part of my daily tasks and as a result, there is a variety of tools and resources which I make use of to accomplish these tasks. Without a doubt it has taken me quite some time to decide just which of these tools are worthy of a place in my virtual toolbox and which have been discarded in favour of an alternative product.

When one engages in an SEO campaign, determining and understanding the rankings of a web site is of paramount important, without this fundamental data it is difficult to track the performance of your campaign. You could argue you can simply track a campaigns performance by a conversion rate, e.g. how many new customers your client is receiving or products being sold via their website but in order to carry out optimization you have to know what phrases are performing well, which are not and how changes made to a website are affecting these rankings.

There are many tools out there which will gather data for the rankings at the time of generation however to accurately track the success or failure or your efforts the historic data must also be available for you to review the campaign over time.

Typically many applications expect this to be a manual process whereby the data is first exported in the CSV (Comma Seperated Values) format prior to then being imported into Excel or another Spreadsheet application for data analysis. Charting this data for visual representation would then require further manual intervention.

These manual methods are further complicated when we also decide that we want to track our rankings on multiple search engines. Tracking the results simply on Google, Bing or Yahoo is becoming less of standard practice as vertical search is becoming more popular both by users as well as being pushed upon us by the search engines. Local business & service results should also be taken into consideration on the ‘local’ search engines, such as Google maps or places and Yahoo Listings. If like me, you are marketing products that not only are aimed at one geographic location, you may want to also track results on country specific search engines such as Google.co.uk in addition to Google.com.

The manual approach of tracking these results, exporting the data and then importing it into various Excel workbooks is nothing short of an administrative nightmare, and tends to deter the SEO practitioner from regularly gathering and managing these statistics, which of course without this information will harm the SEO campaign and lead to an unhappy client.

This is where Advanced Web Ranking fits into the puzzle perfectly, it is made quite clear very soon when you start to use that product that it has been well thought out, addresses the common requirements of the modern search engine optimizer and I am pleased to see also that the product is regularly updated. By regular updates I am not hinting there are high numbers of bugs that require frequent updates, this is not Windows I am referring to. An example would be new search engine definitions, for a massive variety of countries are regularly added.

The ability to run your campaigns for different projects, with different search engines and of course different keywords and phrases all from a single product is itself in my opinion a standard set of features that all ranking tools should adhere to, however the features that initially caught my attention and drew me to the Advanced Web Rankings product was the reporting feature.

I really had been surprised at the sheer lack of products available for search engine optimizers that include any reporting features, at least of sufficient quality. As I have mentioned and hinted at already, the manual process of generating data and manipulating spreadsheets to present data should these days be a technique to be found only in the history books, but many site rank reviewing products still do not include this feature.

Ultimately the onus is on us as professional SEO’s to keep our clients well informed and up to date with the performance of the campaign. After all they are paying us for the service so a product that allows us to create attractive reports ready to distribute to our clients with the click of the mouse is a must have tool.

Although I haven’t used it myself, Advanced Web Ranking provides an automation feature that allows you to schedule automatic updating of the keyword and phrase rankings and once complete, have the reports automatically generated and distributed.

I feel I must of course also point out any issues I personally have found with the product and the only niggling problem I have found, isn’t really a problem but more of a feature request anyway. To improve the readability of the keyword rankings in chart form, Advance Web Rankings allows the user to specify a unique colour for each keyword. What I would love to see is the ability to reset all colours and have a different colour automatically assigned for each keyword. As when you have a campaign with many different keywords, if they all share the same colour it can make differentiating the keywords in the charts quite hard, you can specify the colours yourself, but a quick reset function would be great.

There are many other features provided in this tool which I fully intend to investigate further when time permits, such as a keyword research tool for example, but what I can say for certain is that for the features I required at the time, Advance Web Rankings does a great job and for the reporting and rank tracking alone deserves a spot on any SEO’s shelf who is serious about providing a good service to their clients.

For more information on Advanced Web Ranking, visit their website at Advanced Web Ranking logo http://www.advancedwebranking.com/

April 28th, 2010

Android code to launch google maps in Navigation Mode!

Intent i = new Intent(Intent.ACTION_VIEW,
Uri.parse("google.navigation:q=Hemsworth+Pontefract"));
startActivity(i);

March 21st, 2010

I’ve been intending for quite some time to write a series of articles on my experiences so far with Grails based web applications. So I’m tackling this now whilst my experiences are still relatively fresh before my focus takes another direction.

I don’t want to go into the why’s of using grails when there are already many other frameworks out there but for me, I love Java for its power, vast number of libraries and community support available. I also love Ruby On Rails, for its convention over configuration benefits so when I discovered Grails is a kind of merge of the two, it quickly gained my interest. There are many cool features to Grails but to pinpoint a couple, not having to go through all the initial setting up of Spring, Hibernate, JPA etc is a real time saver, and how it allows you to use it’s own Groovy code alongside pure Java is something in my opinion both very clever and incredible beneficial to us web developers.

My target for these tutorials are not just for beginners to Grails but for anyone looking for quick how-to instructions to use Grails with various Ajax features such as displaying data in a jQuery grid, ajax filtering of data.

I do make the assumption however that you already know the basics of a grails based application and can already create, modify and deploy projects. I also don’t want to insist on any particular IDE for working on these tutorials, although I will be using IntelliJ’s IDEA IDE, Netbeans also has great Grails support but at the time of writing does not offer gsp tag completion. I cannot offer any other comment on the others as I am not familiar with Grails support in the other main contenders.

I also cannot recommend enough the combination of using Firefox as your browser with the Firebug plugin installed so you can keep an eye of your AJAX calls from your page to server. Firebug is a great tool that allows you to easily see what you are sending and what you are receiving.

Anyway enough introduction, let’s move onto the first tutorial of my series.

Grails, JQuery and the Jquery Grid.

In this tutorial I aim to show you how to use the jQuery Grid to present data to your users.

I am using Grails version 1.2 alongside MySQL database.

I will setup a mock up of a customer database for this example, so first you will need to create a new Grails project and setup your datasource details so you are all setup ready to go.

The first step after you’ve created your project and defined your datasource is to create a new Grails Domain class called Customer. I’ve kept it simple, but with enough fields for us to create and display several columns in a grid.

class Customer {
  static constraints = {
    firstName(blank:false,maxSize:50)
    lastName(blank:false,maxSize:50)
    age(nullable:true)
    emailAddress(nullable:true)
  }

  String firstName
  String lastName
  Integer age
  String emailAddress
}

Once your class is defined, you should go ahead and generate the customer controller and corresponding views.

Now would be a good time to add some test data so we have something we can use to manipulate our views. A handy shortcut to create test data here is to edit the bootstrap groovy file so we can create some data at the time our application is launched. This is a technique I often use to preload testdata.

class BootStrap {

def init = { servletContext ->
  // if we have an empty customer database,
  // create some test data
  if (Customer.count() == 0) {
    new Customer(
      firstName:'John', lastName:'Smith',
      age:27,
      emailAddress:'john@somewhere.com'
    ).save()

    new Customer(
      firstName:'Frank', lastName:'Malone',
      age:37,
      emailAddress:'frank@somewhere.com'
    ).save()

    new Customer(
      firstName:'Dave', lastName:'Brown',
      age:34,
      emailAddress:'dave@somewhere.com'
    ).save()

    new Customer(
      firstName:'Barney', lastName:'Rubble',
      age:44,
      emailAddress:'barney@somewhere.com'
    ).save()
  }
}

def destroy = { }
}

I will also change the urlmappings so when we launch the application our default page is the customer index view :

class UrlMappings {
  static mappings = {
    "/$controller/$action?/$id?"{
      constraints {
      // apply constraints here
    }
  }
  "/"(controller:"customer",action:"index")
  "500"(view:'/error')
  }
}

So try running the application now and you should see the default presented list on the customer page. So far so good.

Before we create the necessary adjustments to use a jQuery grid, you will first need to download the required javascript librarys as well css styles for your grid from the following links:

jQuery latest release

jQuery Grid latest release – contains the necessary javascript and css (ui.grid.css). Copy the ui.grid.css to the web-app/css folder.

jQuery UI css themes : theme download – this is a great site that allows you to visual different UI themes for jquery widgets/plugins before downloading the necessary css/images.

I download the ‘min’ versions of the javascript librarys to cut down download time for the user. jquery.jqGrid.min.js and jquery-1.3.2.min.js both go into the web-app/js folder.
You theme will be downloaded as a zip file, you will need to copy the jquery-ui-1.7.2.custom.min.js script into your applications js folder and the contents of the css folder go into your web-app/css folder. For the purpose of this tutorial I downloaded the ui-lightness theme.

So now I want to switch from the default list view, to a jQuery Grid to present our customer data.

Edit your Customer/list.gsp, and perform the following.

1. Include our new javascript librarys by adding the includes into the head section. Our css style sheet should also be reference by also adding to the head section. Your head section should then contain the following:

<link rel="stylesheet" href="${resource(dir:'css',file:'main.css')}" />
<link rel="stylesheet" href="${resource(dir:'css',file:'ui.jqgrid.css')}" />
<link rel="stylesheet" href="${resource(dir:'css/ui-lightness',file:'jquery-ui-1.7.2.custom.css')}" />
<g:javascript library="jquery-1.3.2.min"/>
<g:javascript library="jquery-ui-1.7.2.custom.min"/>
<g:javascript library="grid.locale-en"/>
<g:javascript library="jquery.jqGrid.min"/>

2. Remove the tag and contents of

tag as well as the paginator tag that immediately follows it.3. I usually create page fragments for my jquery specific grids but for this example we will just place the code directly into the main list page.

You have to create a table element to hold our grid, as well as div element to go at the end of the table to display record count, paginator.

Insert the following jquery Grid definition. This defines a very basic grid which will be rendered when the page loads in the browser. Notice the url parameter, url:’jq_customer_list’. This is the url from which the grid will load its data. I have also specified the format of the data will be JSON. These parameters lead us to our next stage, we need to create the necessary function in our Customer controller that will return the data.

<!-- table tag will hold our grid -->
<table id="customer_list" class="scroll jqTable" cellpadding="0" cellspacing="0"></table>
<!-- pager will hold our paginator -->
<div id="customer_list_pager" class="scroll" style="text-align:center;"></div>

<script type="text/javascript">// <![CDATA[
/* when the page has finished loading.. execute the follow */
$(document).ready(function () {
  jQuery("#customer_list").jqGrid({
  url:'jq_customer_list',
  datatype: "json",
  colNames:['First Name','Last Name','Age','Email Address','id'],
  colModel:[
    {name:'firstName'},
    {name:'lastName'},
    {name:'age'},
    {name:'email'},
    {name:'id'}
  ],
  pager: jQuery('#customer_list_pager'),
  viewrecords: true,
  gridview: true
  });
});
// ]]></script>

4. Create the jq_customer_list action in the Customer controller to respond to the grids request for JSON data.

As we are returning JSON type data, you must add an import to the top of the controller : import grails.converters.JSON

Note that the order of the fields must match the order in which we defined the order in the colModel and colNames in the grid definition. The minimal code to return the data is as follows:

def jq_customer_list = {
  def customers = Customer.list()
  def jsonCells = customers.collect {
    [cell: [it.firstName,
    it.lastName,
    it.age,
    it.emailAddress], id: it.id]
  }
  def jsonData= [rows: jsonCells]
  render jsonData as JSON
}

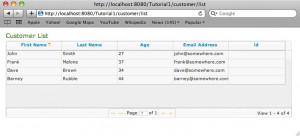
5. Try and run your application, if all succeeded you should be presented with your customer data in a nice looking grid.

customer list presented in a jquery grid

Browser showing customer list presented in jquery grid

The entire project for this tutorial can be downloaded here.

In my next tutorial I will take what we have done so far, and implement ajax pagination and table sorting when the user clicks on a column header.

Interested in learning more grails?  Head over and join up at the grails forum


About Me

Welcome to my blog. Here you'll find mainly work related content, a suppository for all my notes which otherwise would end up on a post it note.